1 Starting with Excel
- What spreadsheets are.
- Starting and closing Excel.
- The layout of the Excel program window.
- Creating and saving a new workbook.
- File formats of Excel.
1.1 What is Excel?
Excel is part of the Microsoft Office suite. It allows you to perform calculations in spreadsheets. This chapter provides an introduction to spreadsheets in general, with a specific focus on Excel.
A spreadsheet is a computer program that lets you enter data (text, numbers, etc.) into sheets made up of rows and columns. Besides entering data, you can also perform various operations on it. Microsoft Excel is one such program.
The term “spreadsheet” is also used to refer to a file created with such a program. In Excel, this file is called a workbook. The standard file format is .xlsx, but Excel supports many other formats for both reading and saving files.
A workbook can contain one or more worksheets. A worksheet is divided into rows and columns, and their intersections are called cells. Cells are identified by a column letter and a row number — for example, B3 refers to the cell in column B, row 3.
You can enter text, numbers, and formulas in cells. Formulas allow you to perform calculations or manipulate text. They can reference other cells, making it possible to build large and complex calculation models. Any change will automatically update all dependent values.
Spreadsheets are very useful for performing What-if analysis, where you modify input values to see how they affect results. Excel also makes it easy to create clear and attractive charts.
1.2 Starting and Closing Excel
How you start Excel depends on your system setup. This course assumes a default installation of Microsoft Office 365 on Windows 10. On most systems, Excel can be launched from the Start menu. The easiest way is to use a shortcut on the desktop or taskbar.
Task 1.1
- Choose Start > Excel.
The Excel start screen appears. On the left, you’ll see recently opened files; on the right, an overview of available templates.
- Click on the Blank workbook template. A new workbook opens named Book1 with a blank worksheet named Sheet1.
By default, Excel shows the start screen at launch. This includes recent documents and templates. If preferred, you can start Excel with a blank workbook:
Go to File > Options > General tab and uncheck the option Show the Start screen when this application starts.
Next time you launch Excel, it will open directly to a new workbook.
To exit Excel:
- Click the X button in the top right corner of the window.
- Or choose File > Close from the menu.
- Close Excel.
If changes were made to the workbook, Excel will prompt you to save them before closing.
1.3 The Excel Window
The Excel interface includes three main areas: the application controls, the worksheet, and the status bar. These are shown top to bottom in the image below.
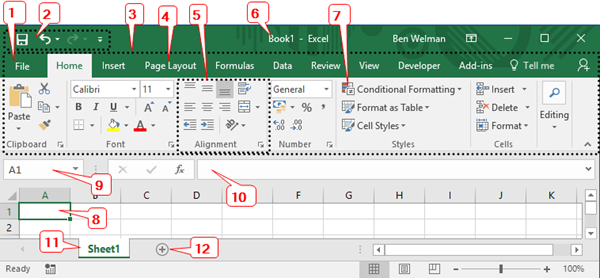
- 1 - File
-
Opens a menu with basic commands such as New, Open, Save, Print, and Options. This view is known as the Backstage.
- 2 - Quick Access Toolbar
-
A customizable toolbar with shortcuts for commonly used commands. Default buttons include:
 Save
Save Undo
Undo Redo
Redo Form
Form
- 3 - Ribbon
-
A wide toolbar at the top. Commands are grouped under tabs like Home, Insert, Page Layout, ….
Some tabs, such as contextual tabs (e.g., Chart Tools), only appear when relevant. Commonly used commands are on the left, specialized ones on the right.
You can’t remove the ribbon, but you can minimize it using CTRL + F1. Press it again to restore.
- 4 - Tabs
-
Located above the ribbon. Each tab contains groups of commands. Some tabs appear only when needed.
- 5 - Groups
-
Each tab has groups of related commands. To see more options, click the small arrow
 in the bottom right of the group.
 - 6 - Workbook Name
-
Displays the name of the file.
- 7 - Command Button
-
Click to execute a command. It may apply changes immediately or open a menu or dialog box.
- 8 - Active Cell
-
The selected cell is outlined in black. In Figure 1.1, the active cell is
A1. - 9 - Name Box
-
Located next to the formula bar. It shows the reference of the active cell or its assigned name. You can also assign names here.
- 10 - Formula Bar
-
Displays the data or formula in the active cell. You can edit content here as well.
- 11 - Worksheet
-
A workbook can contain multiple worksheets. A new workbook starts with Sheet1. Click the worksheet tab to switch sheets or click
+to add one.
1.4 Creating a New Workbook
You can create a new workbook at any time. It can be blank or based on a template.
Task 1.2
Click File > New. Templates will appear on the right.
Click Blank workbook. A new workbook with one worksheet is created.
1.5 Opening a Workbook
Ways to open an existing workbook:
- Double-click the Excel file in File Explorer.
- Select Open from the start screen.
- Choose File > Open from within Excel.
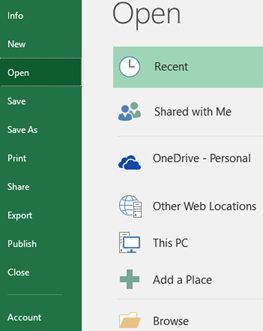
Click This PC or Browse to locate the file. To open other formats, use the dropdown arrow next to the file type list:

Task 1.3 File: Weatherleather.xlsx
If necessary, start Excel.
Open the file.
1.6 Saving a Workbook
The most common ways to save a workbook:
- File > Save
- Quick Access Toolbar > Save button
When you save an existing workbook, the previous version is overwritten. For new files, the Save As dialog appears.
Task 1.4
- Save the workbook using one of the methods above.
If this is the first time saving the file, Excel will prompt you with the Save As dialog.
Select a location.
Enter a file name in the File name field and click Save.
1.7 Save As
To create multiple versions of a workbook or use a different format, choose Save As.
You can specify both the name and file format:

Available file formats are listed in Figure 1.5:

1.8 Excel File Formats
Formats for Excel 2007–2016
- XLSX: Default format (no macros).
- XLSM: Macro-enabled format.
- XLSB: Binary format for large workbooks.
- XLTX: Template format (no macros).
- XLTM: Macro-enabled template format.
Older formats
- XLS: Format used in Excel 2003 and earlier. Opens in Compatibility Mode.
- XLT: Template format from Excel 2003 and earlier.